


Design Documents in a Wiki
I’ve usually written said documents using Microsoft Word. I’m a big fan of pictures for explanation, so I also make heavy use of drawing tools like Microsoft Visio (or OmniGraffle on the Mac) and IBM Rational Rose, Visual Paradigm, or a variety of other specialized modeling tools. I’ve even included the odd Concept Map and Mindmap where it served a good purpose.
I have a problem with documents, though. It’s something I’ve noticed that occurs several times in the software development world. I suppose this is a topic for an entirely different posting, but I’ll summarize it here. We all suffer from an abstraction problem. That is, we have specific needs for our creation tools, but our tools do not live up to our needs. Because our tools are so ubiquitous, we don’t necessarily even see that there is a problem, or we view it as something we can’t change and make do as best as possible. This is inefficient at best and can severely impact our projects at worst.
What do I mean by this?
The two examples I want to mention both suffer from our use of the file metaphor. Our operating systems work based on files, which is our smallest “unit of work” for working on our file systems. Files in the file system are exclusive units that only one person gets write access to at any one time. The first example I want to use is the problem we encounter when writing code in files. The moment we put more than one class in a file, we’ve created a problem when someone else wants to edit the classes in that file the same time we do.
For example, file X contains classes A and B. I’m editing class A and I have file X locked. If someone else wants to edit class B then they have to perform a variety of gyrations to get a copy of file X, edit it independently, and then merge their B with my A to fix things up. We see these actions as normal in software development, but all that’s happened is we’ve built complex processes and tools around fixing a problem with the metaphor we use (the file).
The second example is a document written in a word processor, which covers almost all the documents I’ve mentioned up until now. Here we have a single file representing the entire document. We can sometimes wiggle out of the code editing problem I mentioned earlier by doing more divide and conquer (like breaking up classes A and B and putting them into files XA and XB). This is not so easily done with documents. Word processors do allow you to split larger documents into smaller ones but they get cranky with you if you move the sub-documents around or modify them in unexpected ways. Once split (either by program or by hand) you require someone to put the document back together once various people have made changes to their sections.
So our first need is this: Is there some way we can break up a document into fragments to give us the same level of flexibility in divide and conquer as we can do with source code?
Assuming we can get this, we have several follow-on needs that get created.
The second need is: How do we keep track of everyone’s changes so we can undo them in a controlled fashion should we need to, or find our who has done what? Basically, this is very granular version control for each section of the document (however big you define a section).
The third need is: Assuming we can do all of this, how do we “compile” the separate document fragments back into something that is readable? I use the word compile here to draw an analogy to the file/code example. Although people do need to look at specific sections (classes in a file), there comes a time when you want to look at the whole thing (the program) and people more often than not want the entire thing.
The fourth need is: documents need to be completely accessible to anyone who should have the ability to read them. This sounds obvious, but document accessibility is often made far too inconvenient. Documents take a lot of time to write. This usually means that the drafts/incomplete documents are away on someone’s hard drive or otherwise inaccessible to the developer public. Another way of looking at this is that documents are often stored in a manner that is easy for the person editing the document, but inconvenient for the readers to view the document. Anything that makes a document inconvenient to read means that it will not be read. This must be avoided at all costs, else the cost is paid when the effort to create the document is wasted.
There are other typical word processing-like requirements as well. Roughly speaking, I will summarize this into my fifth need:
- formatting (regular text, headings, styles)
- hierarchical representation (table of contents. headings, index)
- figures (in whatever graphical formats you need)
- tables
- references (inter document links, figure references, table references, extra-document links)
So that’s the problem. After thinking about this for a while, I believe that we should move away from word processor based documents and move to something that can handle document fragments. I also believe that our best solution for this is a wiki.
I should note that I am using the open source MediaWiki software for the purposes of this article. MediaWiki powers Wikipedia and is straightforward to set up.
Now let’s take a look at how a wiki solves the needs I’ve mentioned before.
In the case of the fifth need, a wiki supports everything I’ve mentioned. Figures are usually imported as JPEGs, but this is the equivalent of the copy and paste we do with a word processor.
In the case of the second need, a wiki provides complete version tracking and, presuming you turn on the security, complete user tracking of changes. Developers can subscribe to see changes on different pages, or look at the built in change log to see what has been changed.
In the case of the fourth need, a wiki provides accessibility to the document at all times. Developers can mark a section as draft or not approved by writing this in the text itself. The changes are immediately viewable as soon as they are saved. Furthermore, each article has a discussion tab that allows commentary, todos, interpretation, questions, or whatever developers need for asking questions about a specific section. This is best done here rather than e-mails because then the information is available to all people and is not lost in the huge e-mail boxes we all accumulate.
Needs one and three require something extra, which makes up the rest of this article. But first, we need to cover a feature of wikis that isn’t well known.
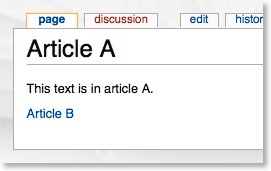
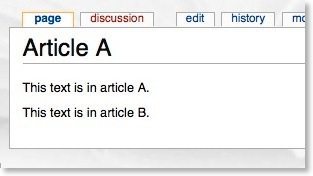
If you’ve ever edited a wiki article, you will know that you can link to other articles using the [[article]] reference notation. So, if I am editing “Article A” and I wanted to reference “Article B”, I would put the following notation in the code:
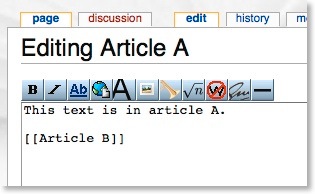
Which would then appear as follows when viewing it:
What’s less well known is the {{:article}} notation, which is intended for templates. This notation includes the text of the referenced article directly into the article you are viewing. If I am editing “Article A” and I wanted to include “Article B”, I would put the following notation in the code:
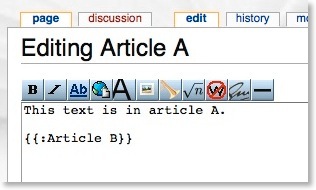
Let’s say Article B contains:
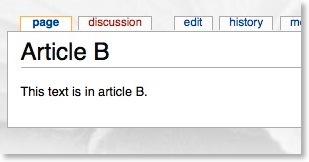
Using the notation mentioned, Article A now appears as follows when viewing it:
This feature is simple so the power of it (and the relevance to this article) might not be immediately obvious. This wiki “include” feature (called Transclusion) provides everything needed to satisfy our third need. That is, we now have the ability to make document fragments and weave them back together into an entire document. Furthermore, this capability is hierarchical, which satisfies the first need. The hierarchical feature allows us to break up a document to any level of resolution for editing and maintenance capabilities, yet allows complete viewing of the document in its entirety.
Below is an example of a HLD using this technique. I personally like the HLD structure as described by Maier and Rechtin in “The Art of Systems Architecting”. Using that as a guide I’ve created the structure below.
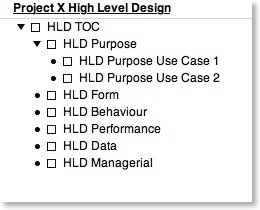
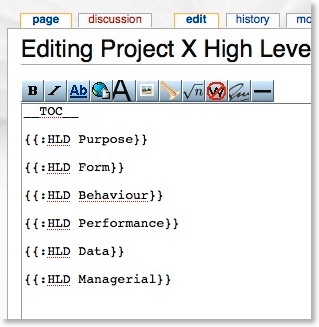
Each of the top level sections gets its own subsection in the wiki, named based on the previous diagram. You can use any naming system that works for you. Using that as a style, this is then the wiki entry for the top level of the HLD (called “Project X High Level Design” ):
Assume that I populate all of the subsections with content. The top level of the HLD now appears as follows when viewing it:

Assuming I print it as a PDF (using the “printable version” feature that comes installed in the wiki) I get a document you can view by clicking here.
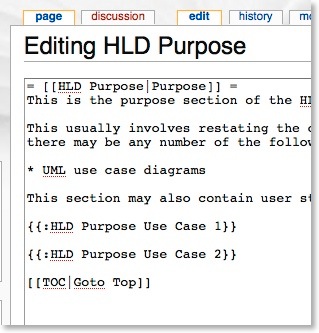
You can see a nested include in the Purpose section:
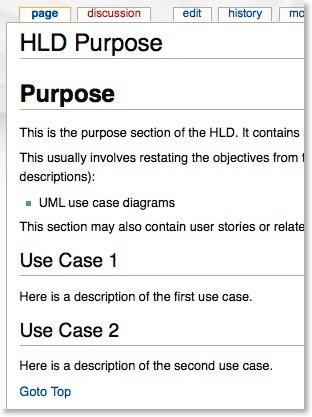
If you edit the purpose article:
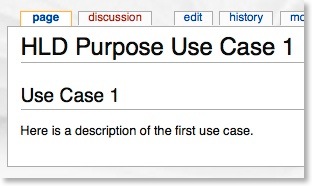
If you drill down further to the first use case you can see more about how the hierarchy works.
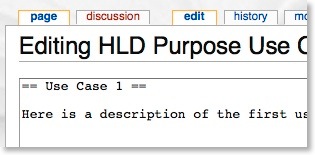
If you edit this use case:
The complete contents of all wiki articles used for this page may be seen by clicking here.
The benefit of having a document set up in such a way is you only need to divide the document into smaller subsections as needed. The more people working on a particular area, the more granularity you need in that area. You do not need to plan this in advance and can gradually break the document down into smaller and smaller articles as your project grows. As you break the document down, you have a complete audit trail every step of the way as provided by the wiki software.
I’d appreciate you letting me know what you think of this technique.
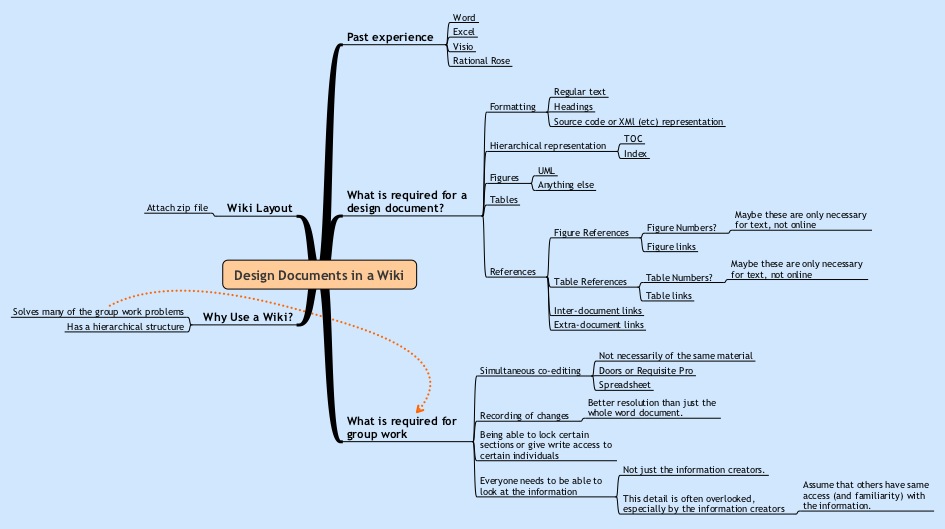
You may like to see the mindmap that was used to write the draft of this entry. Please click on the map below for a bigger picture.
Using the Unix System V Semaphore as a Mutex
There may come a time in your career where you are forced to use the System V semaphores. This came for me recently where I couldn't use the POSIX semaphores nor the pthreads semaphores due to incompatibilities with the kernel I was using. So, I pulled out the old warhorse System V semaphore that I haven't used in a very long time.
Personally I think that the System V semaphores were invented to torture mere mortal developers. They are all-singing-all-dancing semaphores that can do any combination of counting that you like, if you could only figure them out. I just wanted a simple mutex semaphore.
Briefly speaking, mutex semaphores are binary semaphores. They can be locked or unlocked. If the semaphore is unlocked then a process that tries to access them is granted access and "controls" the semaphore. If the semaphore is locked then the requested process is blocked until the controlling process unlocks the semaphore. With this you can get exclusive access to a resource, like shared memory.
I have created a test file that you can use to play with the semaphore. Download semtest.c. You can then compile and run the file in separate processes and test the semaphore by locking and unlocking it by blocking different processes.
The rest of this posting explains the use of the semaphore.
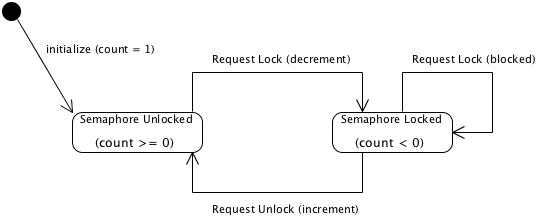
To use a System V semaphore as a mutex, you need to do the following steps. Refer also to the state machine below:
- Create the semaphore
- Initialize the semaphore to one (1) to put it in the unlocked position
- To request a lock (grant exclusive access to your resource), decrement the semaphore count
- To request an unlock (release exclusive access to your resource), increment the semaphore count.
Creating the semaphore
To create the semaphore, you need to perform the following steps:
- create a file in the filesystem to hold the semaphore
- set up a token to the file
- create the semaphore itself
The code to do this is:
//---------------------------------------------------------------// create a file in the filesystem to hold the semaphore//---------------------------------------------------------------// create a filename in a char* “buffer” (see semtest.c for full details)if (( theMutexSemFile = open(buffer, O_CREAT|O_RDWR, S_IRWXU|S_IRWXG|S_IRWXO)) == -1){ printf("theMutex file open problem: %m\n");}//---------------------------------------------------------------// set up a token to the file//---------------------------------------------------------------// Semaphore ftok() ID parameter used between the interface and agent.#define SEM_KEY_ID 0x01// Open the file token for the semaphoretheMutexSemToken = ftok(buffer, SEM_KEY_ID);if( theMutexSemToken == (key_t)(-1) ){ printf( "ftok failed: %s (%d)\n", strerror(errno), errno );}//---------------------------------------------------------------// create the semaphore itself//---------------------------------------------------------------// Configure the semaphoretheMutexSem = semget( theMutexSemToken, 1, IPC_CREAT | 0666);if( -1 == theMutexSem ){ printf("Semget failed - %s (%d)\n", strerror(errno), errno);}
Initialize the semaphore to one (1) to put it in the unlocked position
The default semaphore count is zero. This will create an immediate deadlock if you request a lock, when you want the first process to get the semaphore when you request it. To set it to one, use the following code:
int initialSemaphoreValue = 1;if( -1 == semctl( theMutexSem, 0, SETVAL, initialSemaphoreValue) ){ printf("semctl failed - %s (%d)\n", strerror(errno), errno);}
To request a lock (grant exclusive access to your resource)
Once the semaphore is set up, the process decrements the counter to set the lock. The first process gets in “free” because the counter is set to 1. It must be set to 1 so the first process is not blocked on the first request, creating a deadlock situation.
Once the first process requests a lock, the request decrements the counter so it is set to zero. Technically the semaphore is not yet locked. When a second process requests a lock, it will decrement the counter again and lock because the counter has transitioned to -1.
The code to decrement the semaphore is below:
theMutexLock.sem_num = 0;theMutexLock.sem_op = -1;theMutexLock.sem_flg = 0; // lock the semaphoreif( 0 == semop( theMutexSem, &theMutexLock, 1 ) ){ printf("theMutex lock successful: %m (%d)\n",errno);}else{ printf("theMutex lock fails: %m (%d)\n",errno);}
To request an unlock (release exclusive access to your resource)
The process increments the counter to set release a lock.
The code to decrement the semaphore is below:
theMutexUnlock.sem_num = 0;theMutexUnlock.sem_op = 1;theMutexUnlock.sem_flg = 0; // unlock the semaphoreif( 0 == semop( theMutexSem, &theMutexUnlock, 1 ) ){ printf("theMutex unlock successful: %m (%d)\n",errno);}else{ printf("theMutex unlock fails: %m (%d)\n",errno);}